Continuous Integration and Deployment Guide for Final-Year Students
A project can work perfectly on your laptop and still fail during a group merge, faculty demo, or live deployment.
One teammate may install a different dependency version. A last-minute commit may break login. The server may be missing an environment variable. Manual deployment may copy the wrong files.
Continuous integration and deployment reduce these risks by converting repeated software-delivery tasks into a controlled, visible pipeline. Instead of relying on memory, the repository automatically installs dependencies, runs checks, creates a tested artifact, deploys it to staging, and verifies that the application is responding.
This guide shows a practical GitHub Actions CI/CD pipeline for a Node.js project. The same workflow design can be adapted for Python, PHP, Java, .NET, MERN, and other final-year projects.
Students who are still organizing their repositories can also review FileMakr’s GitHub projects for students guide.
Quick Answer: What Are Continuous Integration and Deployment?
Continuous integration, or CI, means frequently merging code into a shared repository and automatically validating every change through installation, linting, building, and tests.
Continuous delivery keeps validated software ready for release, normally with a human approval before production. Continuous deployment automatically releases every change that passes the required checks.
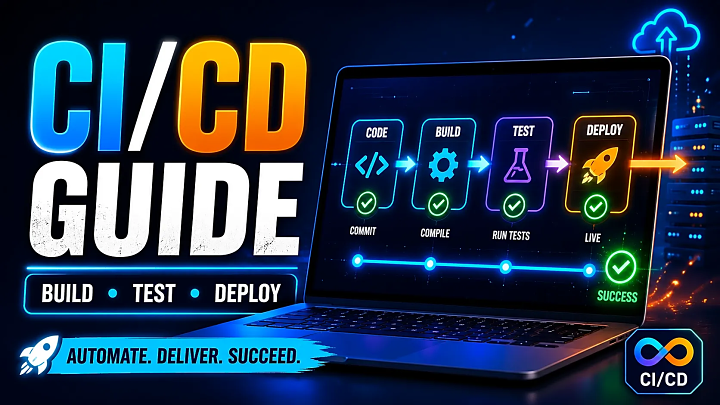
A beginner-friendly CI/CD pipeline follows this flow:
Commit → Install → Lint → Build → Test → Create artifact → Deploy to staging → Health check → Approve production
Start with CI. Add production automation only after your tests, secrets, staging environment, and rollback process are dependable.
CI vs Continuous Delivery vs Continuous Deployment
|
Practice |
What It Automates |
Release Decision |
Best Student Use |
|
Continuous integration |
Build, lint, and tests |
No release |
Validate pushes and pull requests |
|
Continuous delivery |
Build, test, package, and stage |
Human approval |
Faculty demo and controlled release |
|
Continuous deployment |
Complete release to production |
Automatic |
Mature projects with strong tests and rollback |
GitHub Actions is a CI/CD platform that can automate build, test, and deployment workflows directly from a repository. Workflows are YAML files stored under .github/workflows/.
Why CI/CD Matters for Final-Year Projects
CI/CD is not only for large software companies. It solves common college-project problems:
- Team members can work on feature branches without silently breaking the main branch.
- Required checks can stop a pull request from merging when tests fail.
- The team gets reproducible evidence through workflow logs, artifacts, deployment history, and version tags.
- Examiners can review a clean repository and staging link instead of manually installing the project.
- Students can explain testing, configuration management, DevOps, release control, and rollback during the viva.
The strongest viva evidence is not a green badge alone. Show one failure the pipeline detected, the log that revealed the cause, the correction, and the successful rerun.
How a CI/CD Pipeline Works
A practical pipeline contains seven connected stages:
- Trigger: A push or pull request starts the workflow.
- Clean installation: The runner installs exact dependency versions from a lock file.
- Quality checks: Linting and static checks detect avoidable defects.
- Automated testing: Unit, integration, or end-to-end tests validate behaviour.
- Artifact creation: The tested build output is stored for the deployment job.
- Staging deployment: The same artifact is released to a non-production environment.
- Verification: A health check confirms that the deployed application responds correctly.
Deploying the same tested artifact is safer than rebuilding separately during deployment because it reduces differences between what was tested and what was released.
Implementation Guide: Build a GitHub Actions CI/CD Pipeline
Prerequisites
Before automating the project, confirm that these commands succeed locally:
npm ci
npm run lint --if-present
npm run build
npm test
The example below assumes that npm run build creates a dist/ directory and that an SSH-accessible Linux staging server serves the current release directory.
Students who need stronger server-side foundations can review the backend development skills guide. Beginners who are not yet comfortable with repositories, APIs, and hosting can begin with the web development roadmap.
Create:
.github/workflows/cicd.yml
Then add:
name: Student Project CI/CD
on:
pull_request:
branches: [main]
push:
branches: [main, develop]
permissions:
contents: read
jobs:
build-and-test:
runs-on: ubuntu-latest
steps:
- name: Check out repository
uses: actions/checkout@v6
- name: Set up Node.js
uses: actions/setup-node@v4
with:
node-version: "20"
cache: npm
- name: Install dependencies
run: npm ci
- name: Run linting
run: npm run lint --if-present
- name: Build application
run: npm run build
- name: Run automated tests
run: npm test
- name: Upload tested build
uses: actions/upload-artifact@v4
with:
name: student-project-build
path: dist/
retention-days: 7
deploy-staging:
if: github.event_name == 'push' && github.ref == 'refs/heads/main'
needs: build-and-test
runs-on: ubuntu-latest
environment:
name: staging
url: ${{ vars.STAGING_URL }}
concurrency:
group: staging-deployment
cancel-in-progress: true
steps:
- name: Download tested build
uses: actions/download-artifact@v5
with:
name: student-project-build
path: dist/
- name: Configure SSH
env:
SSH_KEY: ${{ secrets.STAGING_SSH_KEY }}
KNOWN_HOSTS: ${{ secrets.STAGING_KNOWN_HOSTS }}
run: |
install -m 700 -d ~/.ssh
printf '%s\n' "$SSH_KEY" > ~/.ssh/id_ed25519
chmod 600 ~/.ssh/id_ed25519
printf '%s\n' "$KNOWN_HOSTS" > ~/.ssh/known_hosts
- name: Deploy versioned release
env:
DEPLOY_HOST: ${{ secrets.STAGING_HOST }}
DEPLOY_USER: ${{ secrets.STAGING_USER }}
DEPLOY_ROOT: ${{ vars.STAGING_PATH }}
run: |
RELEASE_DIR="$DEPLOY_ROOT/releases/$GITHUB_SHA"
ssh "$DEPLOY_USER@$DEPLOY_HOST" "mkdir -p '$RELEASE_DIR'"
rsync -az --delete dist/ "$DEPLOY_USER@$DEPLOY_HOST:$RELEASE_DIR/"
ssh "$DEPLOY_USER@$DEPLOY_HOST" \
"ln -sfn '$RELEASE_DIR' '$DEPLOY_ROOT/current'"
- name: Verify staging deployment
env:
STAGING_URL: ${{ vars.STAGING_URL }}
run: curl --fail --retry 5 --retry-delay 5 "$STAGING_URL/health"
GitHub’s current examples use actions/checkout@v6, actions/setup-node@v4, actions/upload-artifact@v4, and actions/download-artifact@v5.
Configure the Staging Environment
Create a GitHub environment named staging, then add:
|
Type |
Name |
Purpose |
|
Secret |
STAGING_SSH_KEY |
Private deployment key |
|
Secret |
STAGING_KNOWN_HOSTS |
Verified SSH host fingerprint |
|
Secret |
STAGING_HOST |
Server hostname or IP |
|
Secret |
STAGING_USER |
Restricted deployment account |
|
Variable |
STAGING_PATH |
Root deployment directory |
|
Variable |
STAGING_URL |
Staging application URL |
Environment secrets are only available to jobs that reference that environment. Protection rules can require approval, delay a release, or restrict which branches and tags may deploy.
Protect the Main Branch
Require the build-and-test status check before merging into main. Team members should use feature branches and pull requests. Required checks must pass before code can be merged into a protected branch.
Add Production Approval
Create a separate production environment and configure a required reviewer. Copy the staging job, change its environment and secrets, and trigger it only from a version tag or manual workflow.
Production should never reuse staging credentials.
Roll Back a Failed Release
The example deploys each build to:
releases/<commit-sha>
The current symbolic link points to the active release. To roll back, point current to the previous successful commit directory and run the health check again.
Document the command in the README and project report.
Common CI/CD Errors and Fixes
|
Error |
Likely Cause |
Fix |
|
npm ci fails |
Missing or outdated lock file |
Regenerate and commit package-lock.json |
|
Tests do not run |
Missing test script |
Add a meaningful test command |
|
Secret is empty |
Wrong name, scope, or trigger |
Check repository and environment settings |
|
Deployment permission denied |
SSH key or directory ownership issue |
Use a restricted deployment user and correct permissions |
|
Workflow never starts |
Branch or event mismatch |
Review the on configuration |
|
Deployment passes but app fails |
Missing runtime configuration |
Check logs, variables, database access, and health endpoint |
|
Two releases overwrite each other |
Concurrent deployments |
Add a deployment concurrency group |
Advanced Tips for a Safer Pipeline
Keep workflow permissions minimal. Do not print secrets in logs.
For stronger supply-chain security, pin third-party actions to full commit SHAs. GitHub identifies a full-length SHA as the immutable action-reference option; version tags are more convenient but can move.
Add dependency scanning, code coverage, database migrations, smoke tests, and monitoring gradually. Docker is useful when consistent packaging across laptops, runners, staging, and production provides a clear benefit, but it does not replace tests or a CI platform.
For a final-year report, include:
- Pipeline architecture diagram
- Workflow YAML
- Test cases
- Successful and failed workflow screenshots
- Environment-variable strategy
- Deployment architecture
- Health-check result
- Rollback procedure
Frequently Asked Questions
Is GitHub Actions free for student projects?
Standard GitHub-hosted runners are free for public repositories. Private repositories receive plan-dependent included minutes and storage, and usage beyond the allowance may be billed.
Can CI/CD be used for PHP, Python, Java, or MERN projects?
Yes. The stages remain similar, but the installation, build, test, database, packaging, and deployment commands change for each stack.
Do I need Docker for CI/CD?
No. A useful pipeline can run directly on a hosted runner. Add Docker when consistent runtime packaging or container deployment provides a clear benefit.
What is the difference between an artifact and a deployment?
An artifact is the tested output produced by the build job. Deployment is the process of releasing that artifact to staging or production.
Why should staging and production use different secrets?
Separating credentials reduces accidental access and limits the impact of a leaked or misconfigured secret.
What should I show in a CI/CD viva?
Show the workflow YAML, branch rules, a failed check, corrected logs, the stored artifact, staging deployment, health check, and rollback process.
Should a student project use continuous deployment?
Usually, continuous delivery with manual production approval is safer. Use fully automatic production deployment only when tests, security controls, monitoring, and rollback are reliable.
Conclusion
Continuous integration and deployment turn a fragile manual process into a repeatable software-delivery system.
For a final-year project, begin with a clean repository, lock file, meaningful tests, protected main branch, and small CI workflow. Then create one tested artifact, deploy it to staging, verify the result, and document rollback.
This approach is easier to demonstrate, safer to maintain, and far more credible in a viva than a complex pipeline the team cannot explain.
The goal is not maximum automation. The goal is a project your team can build, test, deploy, reproduce, and defend with confidence.
Students selecting their next implementation can explore FileMakr’s final-year project ideas and project source code.
The copy uses a practical, technically authoritative Medium tone while staying within the requested article-length range.